Orchestrating Snowflake Transformations using Airflow


With changing business trends, organizations are always trying to build modern data strategies which are based on platforms that facilitate growth, enhance performance, reduce operational costs and improve agility. Many businesses are also modernizing their data platforms and moving from traditional data warehouse systems to cloud-based systems to accommodate their various business needs.
The Snowflake Data Cloud is one such system that is built on a completely new SQL query engine. It is fully managed, which means that users do not have to worry about back-end components such as servers, data storage mechanisms, and other services like installation & maintenance. It has a unique architecture of traditional shared-disk and shared-nothing database architectures which helps to provide support to all types of data.
Snowflake can help to simplify data pipelines to help businesses focus on harnessing the power of data and analytics instead of infrastructure management. Snowflake can be integrated with a number of other tools to boost the power of this data cloud. One such platform which can be used with Snowflake is Apache Airflow.
What is Apache Airflow?
Apache Airflow is an open-source workflow management platform that can be used for orchestrating complex computational workflows, data processing pipelines, and ETL processes. Airflow helps to visualize data pipeline dependencies, progress, logs, code, trigger tasks, and success status. It also offers an easy-to-use & well-equipped user interface. This makes carrying out complex tasks much easier for the user.
Snowflake Integration With Apache Airflow
One of the most common use cases that can be executed using Apache Airflow with Snowflake Data Cloud is creating an efficient ETL. Airflow with Snowflake helps in automating data transformations by forming an automated ETL.
This blog post talks about the setup of Airflow on an EC2 instance followed by establishing a connection from Airflow to Snowflake along with DAG/process creation for automated ETL.
The steps to carry out Airflow on Snowflake:
Installing Apache Airflow on the EC2 Instance
1. Create a folder for airflow and give it a name. We will use this folder for the installation of airflow
2. Install python virtual environment –
$ pip3 install virtualenv3. Create a virtual environment –
$ virtualenv -p python3 airflow_venv4. Activate virtual environment –
$ source airflow_venv/bin/activate5. Install apache airflow –
$ pip3 install apache-airflow6. Check installation using –
$ airflow infoIf you are getting error while running this, error- sqlite version too old –

To resolve this-
Prerequisite: You will need wget, tar, gzip,“ gcc“, make, and expect to get the upgrade process working. Execute- $sudo yum -y install wget tar gzip gcc make expect
To update the sqlite version follow these steps:
$ wget https://www.sqlite.org/src/tarball/sqlite.tar.gz

$ tar xzf sqlite.tar.gz

$ cd sqlite/

$ export CFLAGS="-DSQLITE_ENABLE_FTS3

       -DSQLITE_ENABLE_FTS3_PARENTHESIS
       -DSQLITE_ENABLE_FTS4
       -DSQLITE_ENABLE_FTS5
       -DSQLITE_ENABLE_JSON1
       -DSQLITE_ENABLE_LOAD_EXTENSION
       -DSQLITE_ENABLE_RTREE
       -DSQLITE_ENABLE_STAT4
       -DSQLITE_ENABLE_UPDATE_DELETE_LIMIT
       -DSQLITE_SOUNDEX
       -DSQLITE_TEMP_STORE=3
       -DSQLITE_USE_URI
       -O2
       -fPIC"

$ export PREFIX="/usr/local"

$ LIBS="-lm" ./configure --disable-tcl --enable-shared --enable-tempstore=always --prefix="$PREFIX"

$ make

$ Sudo make install
Now open the /etc/environment file:
$ sudo vi /etc/environmentAnd add these lines, so the correct version of SQLite is loaded
$ export LD_LIBRARY_PATH="/usr/local/lib"

$ export LD_RUN_PATH="/usr/local/lib"
And run the following command to load the modified file:
$ source /etc/environmentCheck the sqlite version on the OS and the one recognized by Python with these commands: (both should be same)
 $ sqlite3 --version

 $ python3 -c "import sqlite3; print(sqlite3.sqlite_version)"
7. Initialize the Airflow DB –
$ airflow db init8. Create a user –
$ airflow users create --role=Admin --username=admin --password=admin -f=admin -l=admin -e=admin 9. Run airflow webserver –
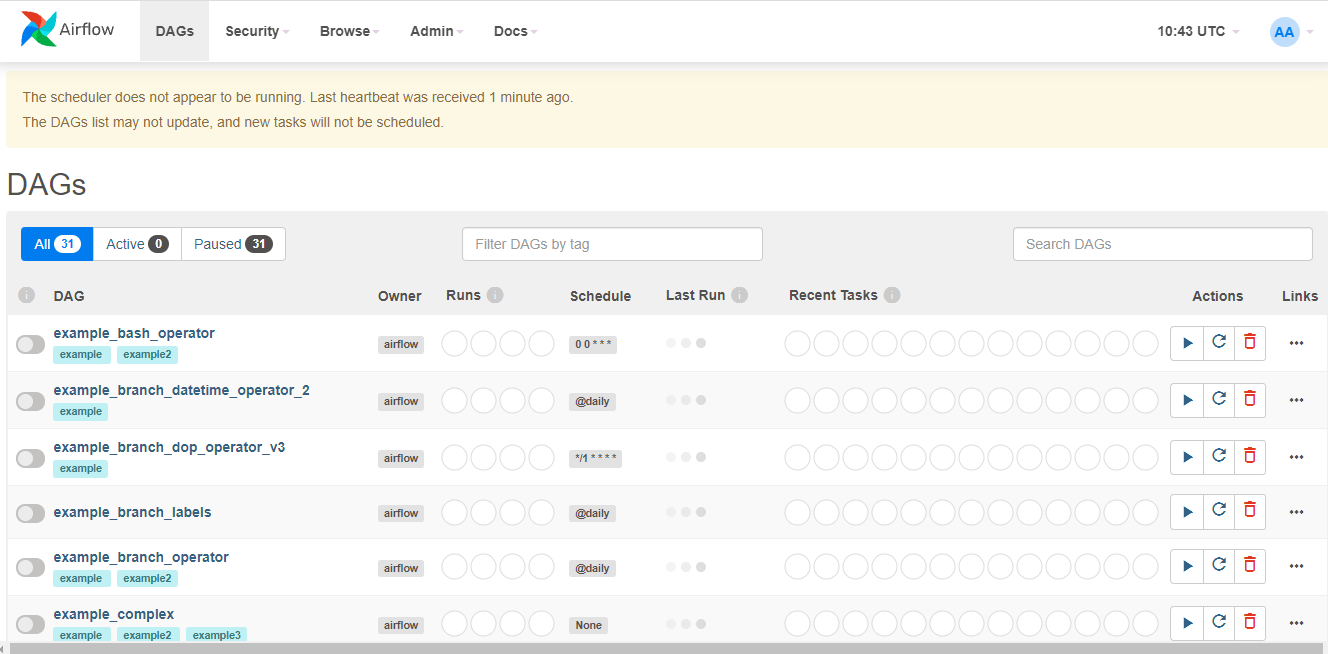
$ airflow webserver 10. Go to a web browser, enter EC2 instance ip:8080, enter username and password (admin and admin) created in step 8, you will be able to see the Airflow interface as below:
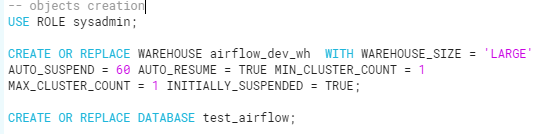
Configuring Snowflake
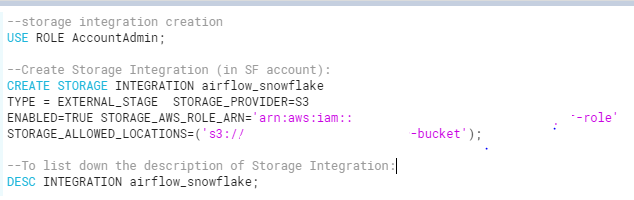
Note down – ExternalId & Snowflake user-arn
Policy addition in Trust Relationships of AWS IAM role (Snowflake-poc-role):
Add above noted ExternalId & Snowflake user-arn in IAM policy-
Example:
{
      "Effect": "Allow",
      "Principal": {
        "AWS": "arn:aws:iam::use_aws_arn"
      },
      "Action": "sts:AssumeRole",
      "Condition": {
        "StringEquals": {
          "sts:ExternalId": "use_external_id"
        }
      }
 }
Provide grant of integration to airflow_dev_role using Account Admin role:
$ grant create stage on schema public to role airflow_dev_role;

$ grant usage on integration airflow_snowflake to role airflow_dev_role;
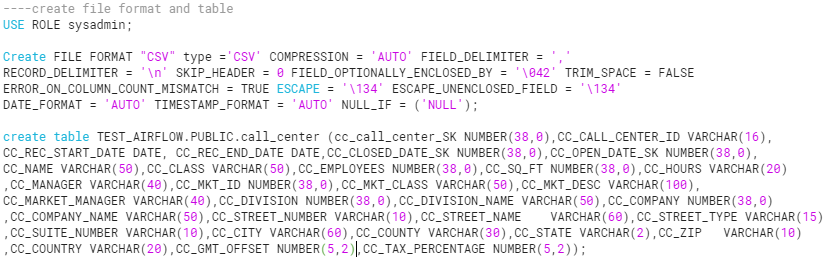
–Execute Grants

Configuring Snowflake Connection in Airflow
1. We need to install a few python packages for snowflake integration with airflow
$ pip3 install snowflake-connector-python[pandas]==2.4.1$ pip3 install snowflake-sqlalchemy==1.2.4Note: make sure snowflake-connector-python, snowflake-sqlalchemy, flask-appbuilder, and sqlalchemy versions should be compatible with each other
2. Now open the web browser, EC2_ip:8080, and go under Admin->Connections. Click on + symbol and add a new record. Choose the connection type as Snowflake and fill in the required details and Save:
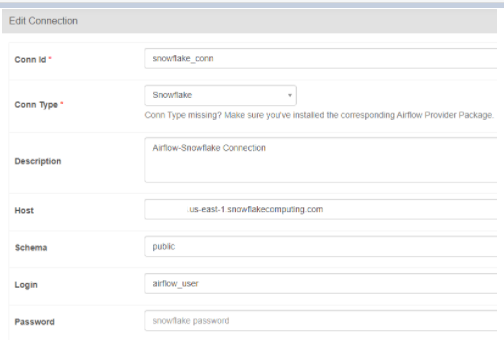
If you are not able to see Snowflake as a connection type try these-
Required versions-
- Apache-airflow >=2.1.0
- snowflake-connector-python >=2.4.1
- snowflake-sqlalchemy >=1.1.0
“ $ pip uninstall sqlalchemy” followed by “$ pip install sqlalchemy==1.3.24”$ pip install apache-airflow-providers-snowflake$ pip install apache-airflow-providers-snowflake[slack]Creation of DAG and Execution
1. Next step is to create the DAG (a python file having the scheduling code), this DAG file needs to be put at a specific location on the airflow machine. Open the file airflow.cfg and locate the property: dags_folder. This is the location where all the DAG files need to be put and from here the scheduler syncs them to airflow webserver. If this folder doesn’t exist, create one
2. Below is one simple DAG file for reference. This DAG file needs to be placed in the above location. You can save it as .py files. For ex: snowflake_airflow.py
import logging
from datetime import datetime
import airflow
from airflow import DAG
from airflow.operators.python import PythonOperator
from airflow.providers.snowflake.operators.snowflake import SnowflakeOperator
from airflow.providers.snowflake.hooks.snowflake import SnowflakeHook
logging.basicConfig(level=logging.INFO)
logger = logging.getLogger(__name__)
SNOWFLAKE_CONN_ID = 'snowflake_conn'
DATABASE_NAME = 'test_airflow'
SCHEMA_NAME = 'public'
TABLE_NAME = 'call_center'
URL = 's3://bucket/Snowflake/call_center_0_0_0.csv.gz'

STORAGE_INTEGRATION_NAME = 'airflow_snowflake'
FILE_FORMAT_NAME = 'CSV'
VIEW_NAME = 'VW_CALL_CENTER'
COPY_COMMAND_STATEMENT= (
    f"copy into {DATABASE_NAME}.{SCHEMA_NAME}.{TABLE_NAME} from {URL} storage_integration = {STORAGE_INTEGRATION_NAME} file_format = (format_name = {FILE_FORMAT_NAME});")
LOAD_VIEW_STATEMENT = (f"CREATE VIEW  {DATABASE_NAME}.{SCHEMA_NAME}.{VIEW_NAME}  as select * from {DATABASE_NAME}.{SCHEMA_NAME}.{TABLE_NAME};")
dag = DAG(
    'snowflake_jobs',
    start_date=datetime(2021, 11, 8),
    default_args={'snowflake_conn_id': SNOWFLAKE_CONN_ID},
    tags=['airflow_snowflake_jobs'],
    catchup=False,
)
COPY_COMMAND = SnowflakeOperator(
    task_id='COPY_COMMAND',
    dag=dag,
    sql=COPY_COMMAND_STATEMENT
    )
LOAD_VIEW = SnowflakeOperator(
    task_id='LOAD_VIEW',
    dag=dag,
    sql=LOAD_VIEW_STATEMENT
    )
COPY_COMMAND >> LOAD_VIEW
1. After completing DAG code, run- $airflow scheduler, and in console, you will be able to see the DAG

2. Unpause the DAG and in Actions, click on – Trigger DAG
3. Once the DAG runs successfully, the scheduler will give a message
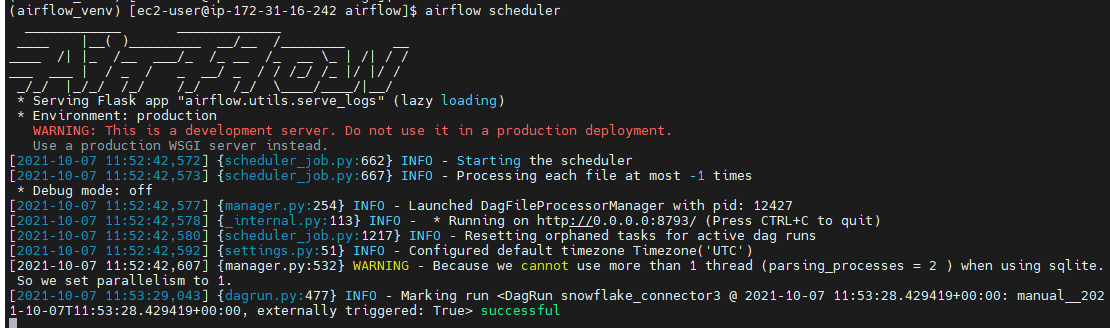
4. The DAG will contain the scheduling information and the sequence in which the tasks will execute. DAG execution can be tracked in the webserver UI and will look something as below:
missing9th

5. You can click on the DAG name and see the tree view, graph view, code, details, etc.
Graph view will look like this-

6. In Snowflake, History – we can see queries executed by DAG

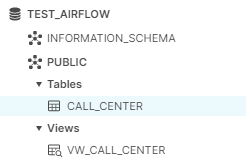
To learn more about automating data transfers with Snowflake and Airflow, get in touch with our experts.